Tie-dye is an easy DIY transformation that brings life to your old clothes through different techniques and colors. This craft is age-friendly as you and your kids can use your creativity. Interestingly, the tie dye process is not new; it has been there for ages.
All you need is the right supplies (most important!) and suitable fabric materials to start your project. If you are wondering how to choose them, do not worry.
I have rounded up all the types of dye, the suitable fabric material to use, and some excellent techniques you can use to transfer those unique designs from your mind onto your rusty clothes. So, ready for some fun? You must be!
Do You Wet Your Shirt Before Tie Dying?
The most considerable confusion is if you should tie-dye the fabric while it’s wet or dry. I recommend dying your fabric while it’s wet, as that’s a more straightforward approach for beginners and experienced dyers.
When planning on dying wet fabric, make sure that the material is not dripping wet and is only slightly damp. When your cloth is somewhat moist, it provides you with control over the shape of the patterns. Otherwise, the colors you use won’t sit properly.
Further, the slight moisture on the material helps it take the form you want it to.
The dye will easily penetrate and spread well on the slightly wet fabric. It will also give an even coloration to the material by letting the colors blend more comfortably.
Let’s now understand why dry tie-dying is bad.
When you dry dye your fabric, it might be a little springy. It won’t be easy to hold your material in place to dye it either. So, the best choice is to secure your fabric while it is wet and then let the fabric dry. The dye will spread much less when the material is dry than when damp.
Do You Wash Tie Dye In Hot Or Cold Water?
It’s recommended to wash tie dye in cold water to secure it and create a long-lasting effect.
Do You Wash Tie Dye Or Just Dry It?
Yes, you have to wash your tie dyed fabric. Once you have completed color-dying your material and dried it, it’s highly recommended to clean it without making your lovely creations disappear or other clothes shady.
Things to know before washing your color-dyed clothes.
- You will always have to wait for 24 hours before washing your tie-dyed clothes, as they take a lot of time to dry and set.
- To get rid of the extra dye on your clothes, rinse your tie-dyed clothes in cold water until the water becomes clear.
- When rinsing your fabric, do not scrub your fabric as your clothes might lose the dye.
- Always try to separate your clothes based on their colors.
You can follow the below steps to wash your color-dyed fabrics – manually or using the machine.
- Machine Wash
After the first wash, most tie dyed clothes can be washed as usual. But if you are concerned about them bleeding onto your other clothes, you can separate them into two different loads for washing.
Here are a few tips that you can follow to keep the color of your dyed garments from fading.
- Always use cold water so that you can stop them from fading.
- Use detergents that are tie-dye friendly or color-safe.
- Always choose the correct settings on your machine according to the fabric type you are washing.
- Never use dryers to dry your dyed clothes. Always air dry them by hanging them.
- Don’t let your clothes sit wet in the machine as there are higher chances for them to bleed.
- Hand Wash
Though it is a more tiresome process than machine washing, hand washing is an excellent way to maintain your tie dyed clothes in good condition. Few steps to follow when hand washing your tie dyed clothes are:
- Fill a tub with cold water or water at room temperature to wash your clothes.
- Add a mild or very gentle washing liquid to the water.
- Use your hands to create a foamy wash for your clothes.
- Put all your clothes into the tub of soap water and soak them for 30 minutes before rinsing all the soap.
- Remove all the water from your clothes by pressing them against the tub. You can also place them on a towel and roll them up to remove the water.
- Air dry by hanging them.
How Do You Tie Dye Step-By-Step? (With Pictures)
There are a few steps that you should always follow for tie dying, especially if it’s your first attempt. I have elaborated the steps so that you can follow them easily.
Step 1 – Preparation
Always make sure that you prepare your workspace. Collect the desired dye and the cloth you will be using before starting your project.
-
Workspace
Cover your table and floor with a tablecloth or plastic sheets to avoid making a mess (personal experience)! If you plan to do a tie-dying event with your friends, shift the entire setup outdoors, giving you more space and freedom.
-
Dye
Always prepare your dye mixture before getting started with your project. Follow the instructions on the packaging of your dye to blend the mixture. One-step dyes usually require only water to be added to the bottles, but if you plan to use bigger dye packs, I recommend a bucket for mixing the dye.
-
Fabric
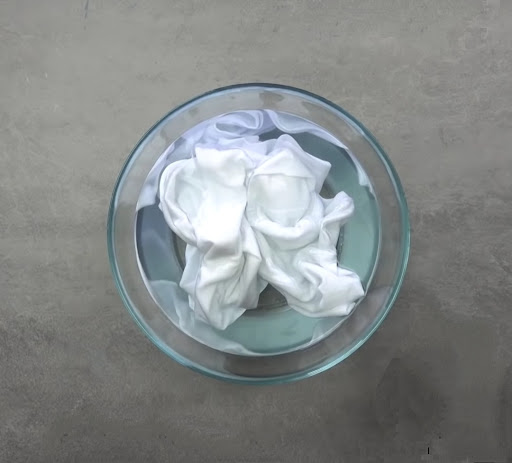
Any new cloth you are using for your project must be prewashed. This will help the dye to penetrate easily. If you use your old clothes to dye, they only need to be slightly damp.
Step 2 – Add Patterns To The Fabric
You can either use rubber bands or twine if you plan to add some patterns to your cloth. This is the simplest and easiest way to add patterns, as per my experience.
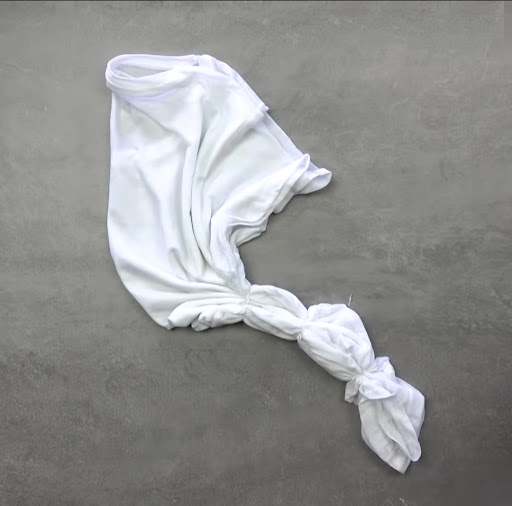
The part where your material is tied will absorb less amount of dye.
You can create many different patterns using this technique. You can also rub candle wax on the string so that the dye is extra resistant.
Step 3 – Dye The Fabric
-
Use A Bucket
Once you have added the patterns to the cloth, you can put it into a dye bucket for it to get dyed. You can check the coloring by taking it out with a pair of tongs. If you are not happy with the intensity of the shade, soak it in again for a bit longer.
Check the package for instructions about the time. When you are happy with the color, put the cloth while it’s wet into a plastic cover to let it set.
-
Use A Brush Or An Applicator
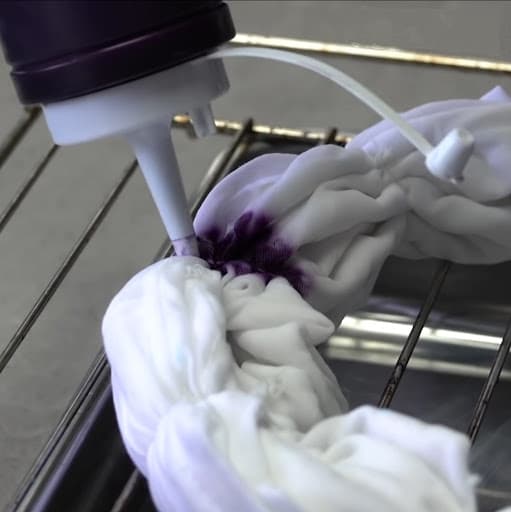
When looking for more control, you can either squeeze the dye bottle into the area you want to dye or use a brush to paint it. Place the cloth on a rack so that the excess dye does not get onto the fabric.
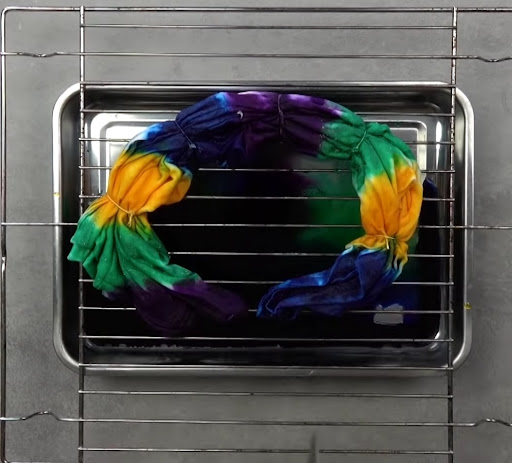
I also recommend putting it in a plastic bag to let the dye penetrate the fabric. You can leave it up to 12 hours or even longer to get a richer shade.
Step 4 – Wash The Fabric
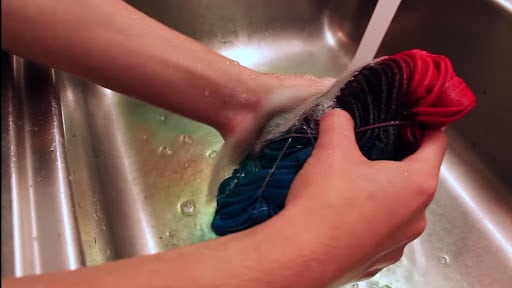
Once you are happy with the color, you can take the cloth from the plastic cover and rinse it under cold water. Keep rinsing it until the water runs clear.
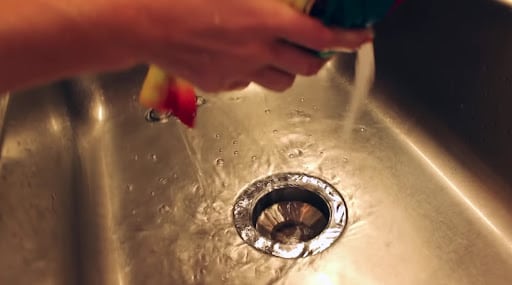
Step 5 – Repeat for Newer Shades (Optional)
If you plan to add other or overlapping colors to your fabric, you can repeat with different colors. While doing so, you should be very careful as the new color can change the existing dye color on your cloth.
When you do this, white parts will take the new shade, and the existing color might change according to the mixing chart. When done with the dying, rinse it in cold water until the water is clear.
How To Tie Dye With Bleach?
When you’re looking to tie dye darker fabrics, bleach is an excellent option as you can create patterns in contrasting colors.
There are also a few steps that you should keep in mind when working with bleach, as it might damage your skin if not handled with care.
Step 1 – Prepare Yourself
-
Work Outside
When working with bleach, sit in a well-ventilated area or outside as the fumes from the bleach can be too strong. You can also use a larger room, turn on the fan, and open all the windows.
-
Protect Your Hands
Since bleach is a potent chemical, it can burn your skin even when diluted. Wear rubber gloves while tie dying to protect your skin from bleach. You will be able to get these gloves in the cleaning supplies section.
-
Choose Dark Clothes
Dark clothes are the best for tie-dying with bleach as they will give you a contrasting effect.
-
Garments To Avoid
While using bleach to dye your clothes, you can avoid clothes made out of delicate materials. It might cause damage to clothes made out of delicate fabrics like silk, synthetic, etc.
-
Cover Your Work Area
You will have to protect your floors or tables from bleach, as it might damage them. You can cover them with any bleach-resistant material that won’t absorb bleach as it damages whatever is underneath it.
Also, if you are working on the ground, then protect your clothes from getting dirty by laying a plastic cover beneath your clothes.
Step 2 – Create Designs
As discussed above, you can use rubber bands or twine to create your patterns. The portion tied with the rubber band will remain in the actual color, and the other parts will turn into a lighter color.
You can create spiral patterns, random tie dye patterns, an ombre look, a multi-layered pattern, etc.
Step 3: Prepare The Bleach Mixture
-
Use A Spray Or A Squeeze Bottle
When working with bleach, always try using a bottle to store your bleach mixture. You can make the bleach mixture by mixing bleach and water in a ratio of 1:1. A squeeze bottle will give you a more detailed look than the spray bottle, but the outcome will be equal for both.
-
Apply The Bleach To Your Clothes
You can either spray or squeeze the bleach onto your clothes. You can also alter the bleach amount depending on the intensity of the color. High usage of bleach will make the fabric lighter.
-
Setting Time
The color of the clothes will change in 2 minutes, but for the bleach to dry, it will take 8-10 minutes as it has to penetrate the cloth. But it might damage your clothes if you leave the bleach for longer.
-
Wash Your Clothes
You have to wash your clothes immediately to prevent bleaching, as it can damage your clothes if kept for a longer period. You can use a gentle soap to hand wash your clothes by letting them sink in a tub. Use gloves until you have thoroughly rinsed off all the bleach.
-
Dry
When you have thoroughly rinsed your clothes, you should air dry them by hanging them in the open.
Quick Tip: This video tutorial works best if you have difficulty dying with bleach.
How To Tie Dye Fabric?
Many options are available, whether you tie dye your fabric into a single solid color or make your designs. Below, I have explained the steps to get started with your tie-dying.
-
Materials Required
- Any fabric dye
- Any fabric (T-shirts or socks)
- Large buckets (one for each color)
- Long wooden spoon
- Painting sticks
- Apron
- Rubber gloves
- Rubber bands, twine, or cotton yarn
- Scissors
-
Protect Yourself
When working on any dying projects, always wear old comfortable clothes and protect yourself with an apron, and always use gloves when you work on these projects.
-
Make The Dye Mixture
You can use a tub or a big bucket to put your fabric dye into it. For different colors, use separate containers so that the colors do not get mixed up with each other. Make sure to follow the instructions given on the packaging of the dye to achieve the correct ratio of the dye to the water.
You can also add other ingredients according to your necessity.
-
Prepare The Fabric
Always remember to make sure that your fabric is wet before dying it. You can also use any twine, rubber bands, or cotton yarns to secure or tie the material at the required place. The tighter the area is connected, the lesser the dye will penetrate.
-
Dye The Fabric
You can put your fabric into the dye bucket if you are dying with only one color. If you use more than a single color, you can either dip a part of the fabric into the bucket or paint that part with a brush. To dip the fabric in the bucket, you can use a spoon.
-
Let It Set
If you are satisfied with the color, you can let it dry by placing it in a plastic bag. But if you are not happy with the intensity of the color, you can again put it back into the bucket for some time. Repeat this 3 to 4 times to get the color of your linking. Also, follow the manufacturer’s directions for the drying time.
-
Wash The Fabric

When you have let the fabric sit for more than 24 hours, rinse it by cutting the ties with scissors. Wash your fabric only with cold water and let it air dry.
How To Tie Dye With Food Coloring?
If you don’t have access to dedicated tie dyes, you can also use food coloring to dye your fabric. It’s both safe and inexpensive for beginners and kids. You can also tie-dye your old t-shirts, towels, and socks using food coloring.
You can learn how to tie-dye any cloth using food coloring by following the steps below.
-
Begin With The Right Cloth
Always use suitable cloth material to do your tie dying. Make sure to use the cloth made out of cotton, linen, silk, wool, and hemp to get those vibrant looks.
These materials also tend to absorb the dye easily, whereas fabrics like synthetic and polyester might not fully absorb the dye.
-
Supplies needed
- A tub or large bucket (for dipping your clothes)
- White vinegar
- Food color
- Squeeze bottles
- Rubber bands or twines
- Gloves
- A table cloth
-
Prepare The Cloth
Always wash your clothes with cold water before dying them. After you have washed and dried your clothes, start dying them. You can mix white vinegar and water in a ratio of 1:1 and completely immerse your fabric in it. By doing so, the food coloring sticks to your material to give a vibrant look.
Soak the cloth in the vinegar and water solution for an hour. After an hour, you can remove the fabric and squeeze the water out so that the material is damp to start your project.
-
Make Your Design
You can create different designs by folding the cloth and securing them with rubber bands. You can also paint the food coloring on the fabric to make your designs. If you’re falling short of ideas, go with the basic designs from spirals to stars while tie dying your cloth.
Once you have decided on the design, you can fold your cloth into that shape and secure it with rubber bands or strings. Make sure to tie your clothes perfectly by taking your time.
-
Apply Food Coloring
Add the appropriate amount of food coloring to a bowl and mix it with water. Or you can also add water to the food coloring or a squeeze bottle as it will be easy to mix them easily.
Use a separate bowl or bottle for every color. When you want your cloth to have a vibrant look, you can add more dye to the solution. Place your tied cloth on a surface and apply the dye to every section. Make sure that the fabric is fully saturated.
When applying it to one side, flip your cloth to use the dye on the other side. You can repeat it on the other side or even change it up. For the food color to get down to the folds, utilize the tip of the squeeze bottle.
-
Let It Sit
When done with the dying, wrap the cloth with a plastic bag. Make sure the bag is tightly closed by pressing out all the air. You can also use a double bag. Let the cloth sit for a minimum of 12 hours.
The longer the sitting time, the more vibrant the result! You can also leave your clothes for 24 hours for the best outcome.
-
Wash And Wear
After the cloth is dried, remove it from the plastic bag. Carefully remove the rubber bands or string. Rinse your fabric in cold water until the water clears. Then, you can wash it with a gentle detergent.
Pro Tip: Never use warm or hot water as the fibers might open up and wash away the dye. Dry the cloth as usual after washing it. To keep the fabric from getting faded, soak them in cold water.
Do not wash them with other clothes as they might bleed while washing.
How To Tie Dye In A Bucket?
The bucket approach is the classic and most typically used dying method. Even I started with this! It’s also the best when you want to custom-create your colors by mixing your colors. I have explained a few important instructions to follow when using this method.
Instructions to follow:
- Determine the dye amount needed using a scale.
- Test a small fabric sample to see if the material accepts the dye and check how the color appears.
- Remove all the stains from the fabric to get a uniform color when dyed. If required, pre-wash them in warm water to remove the stains.
- Cover the area with a plastic cover to protect the floor from spills.
- Wear rubber gloves to avoid getting your hands stained.
- Fill a bucket with enough mixture so that the cloth can move freely. The combination should be less than 60°C.
- You can also add salt or vinegar to enhance the color.
- Wet the fabric and add it to the dye mixture in the bucket.
- The material can remain in the dye bath from 10 minutes up to one hour. You can also keep stirring the mixture as it helps in even coloring.
- When the preferred color is obtained, take it from the bucket and squeeze the extra dye.
- Rinse the fabric using cold water and dry it.
- You can then wash it with a mild detergent and dry it.
How To Tie Dye Socks?
You can also tie dye socks, as they are super easy and fun! I have explained the simple steps on how to tie-dye your socks.
-
Choose The Suitable Material For Socks
Choose socks made of at least 75% cotton, as they will absorb the dye. Socks made of materials like polyester will not absorb the dye and give you a perfect final product.
-
Supplies for tie-dying socks
Here is a list of supplies you require to tie-dye your socks.
- Socks (plain white)
- Squeeze bottles
- Rubber bands
- Gloves
- Plastic sheet to cover the floor
- A plastic bag to hold your socks
Here’s the step-by-step guide to tie-dye your socks.
-
Wet The Socks
Start with wet socks as they hold the dye better than in the dry state. Soak your socks in water for a few minutes and store them in a plastic bag to prevent drying.
-
Create The Patterns
You can create patterns on your socks by folding or twirling and securing them using a few rubber bands or twines. This is the simplest form to design and make unique patterns.
-
Prepare Your Dyes
You will have to dilute your dye by mixing it with water in a ratio of 1:1. You can also add salt or vinegar to make the dye get onto your socks even better. You can either put the dye in a squeeze bottle and shake it well or put it in a bowl and stir it well.
-
Dye Your Socks
Remove the socks from the plastic cover and use the squeeze bottle to spray the dye. You can also dip your socks into the bowl of paint to dye them.
Make sure to put the tip of the bottle into the gaps to get everything covered. Otherwise, you will be left with white spots on your socks. After you have tie dyed your socks, you can leave them for 24 hours for the socks to soak up all the dye.
-
Wash And Dry Your Socks
Remove the rubber bands or twines from your socks, and rinse them properly until the water is clear. Start with a cold rinse to remove all the extra dye. Then, use any soft detergent to wash them properly. Always air dry your dyed sock.
How To Tie Dye A T-shirt?
Do you know you can even tie dye your old white t-shirts following the few steps I have explained below?
-
Choose The Right T-shirt
Choose t-shirts that are 100% cotton, as the outcome will be more vibrant in that case. Plus, all dyes blend perfectly with natural fabrics, so a cotton t-shirt must be for your project.
-
Choice Of Dyes
You can either choose dyes that come in squeeze bottles or powder dyes. You have to mix water into those dyes according to the instructions given.
Supplies required
- Rubber bands
- Gloves
- Squeeze bottles
- Plastic bags
- A tub
-
Dye The T-shirt
Before starting, you will have to get your t-shirt and cover your work area with plastic. You can then create patterns on your t-shirt and secure them with rubber bands and twines.
Then, dye the material using the spray bottles or dipping them into a dye tub. After dyeing your t-shirt, let it sit for at least 24-hours.
-
Unwrap Your T-shirt
Once your dyed t-shirt has dried, you can remove all the rubber bands and rinse them with cold water until all the excess dye is gone. You can air dry them as usual!
How To Tie Dye Shirts With Rubber Bands?
You can use rubber bands to make patterns as they will help you keep the folds and help maintain the shape of the fabric while dying it. Rubber bands are easy to work with as they are very stretchy and don’t involve any tying.
You will be able to light your fabric from the dye without losing the shape of the material. Rubber bands are also very cheap and readily available. They are the perfect tool for beginners.
Top 5 Tie Dye Folding Techniques
In this section, I have rounded some of my fun-filled tie dying techniques using which you can make beautiful tie dye patterns as I do. Make sure to follow each step mentioned below.
Spiral Tie Dye
- You can begin by pinching in the middle of the fabric. Keep twisting the fabric clockwise by holding on to that section.
- Keep turning it by laying the fabric close to the floor so that the pattern remains flat. The material will fold into a flat roll.
- Secure it with rubber bands, crisscrossing them over the fabric. Make sure to bind the material tight.
- Try different colors for each section made by the rubber bands. You can also use rainbow colors to obtain a rainbow design.
Crumple Tie Dye
- Place the fabric on the floor flat. Then, crush small sections of the fabric jointly and randomly.
- Scrunch and fold the fabric simultaneously now, gather the material into a flat disk and make sure it is tight.
- Wrap the fabric with rubber bands to keep the disk shape. Now, you can add the dye color of your choice.
Bullseye Tie Dye Pattern
- Place the fabric on the floor and take a small part of the fabric from the center.
- Pull the fabric up from that point, and smooth the material down to make a cone.
- Now, cover the fabric with rubber bands with a one or 2-inch gap from the tip of the cone to the bottom.
- Add dye, alternating every stripe with the color of your choice.
Horizontal and Vertical Stripes
- You can start from the left side for horizontal stripes and fold the fabric by alternating it back and forth. Secure the material with rubber bands and apply the dye in alternating folds.
- For vertical stripes, start from the bottom, and fold the fabric by alternating the folds. Secure the material with rubber bands and apply the dye in alternating folds.
Swirl Dye Socks
- Place two socks jointly on the floor.
- Take a small part from the heel, and twist it. Keep turning until it coils like a roll.
- Then, secure with rubber bands and add different colors of your choice to the sections created by the rubber bands.
Conclusion
So, here you go. I hope this tie dying guide helps you craft something unique and vibrant. From tie dye shirts to socks, I’ve discussed every material you can dye at home.
This coming weekend, team up with your kids and tie dye your old white shirt, socks, or anything safely without any hassle. Don’t forget to drop your experience in the comments below. Till then, happy tie dying. If you enjoyed this article, check my post 12 shoe painting ideas.
The post How To Tie Dye? My Step-by-Step Illustrated Guide appeared first on Art & Craft, DIY ideas and Tutorials - Craftbuds.

